Monday, November 29, 2010

a new use for a green bean can...

Oh yes, you read that right. My husband has been converting one of our closets into a crafting/sewing area for me. More on the later (he is actually installing the final component as I type this!!!).

I was looking at a variety of jars/containers to put stuff in. Major problem - I don't yet have a lot of stuff. I have a like 6 scissors, 2 real scrapbooking pens and a few types of adhesive. Nothing compared to some and most of it has been gifted to me.

Since I don't know yet what I will be getting or buying over the next while I wanted to not spend too much money on anything storage related until I know what I really need. I really don't know where I came up with this idea. I could have seen something like this in a magazine or I could be a genius - either way I'm somewhat impressed with myself :)

Now for the title of this post, new use for a green bean can! After making my FAVORITE Thanksgiving dish - green bean casserole - I was rinsing the cans to put into the recycling and it hit me...these are the perfect size containers to hold things in my new craft area!! I washed them out really well but green beans don't really smell that much and the can cleans out nicely.

I had a big book of scrapbook paper that my aunts-in-laws had gotten me for the wedding and one of the browns happened to almost match the browns in my room! On a side note - these are the same aunts that my husband can blame for my new money hog hobby and the best thing, they are HIS relatives! Heehee.

Enjoy the pictures!
*Please excuse the horrible picture taking (I need to read my manual to figure out the best setting for inside, low light pictures). Also, please excuse my lack of makeup and sweats in one picture...my husband came in and decided he wanted to take that picture...

Start with a clean can. Paper of your choosing. And a cutter.

Measure the length of the can from lip to lip.

Cut paper to length.

Then measure around the can.

I added 1 inch extra length for gluing.

My helper and I mid project. (PS. My husband just got done installing the shelf!!)

After this step you need to hold the paper in place for 1 - 2 minutes. I glued all around the can, including the over lap, at once. Mainly because gluing it section by section didn't work, the glue wasn't strong enough. But once I did the whole can around and held it, the glue worked like a charm.

Voila! Container. Basically free.
All I paid for was the tin and even then we ate what came in it.

This was the glue I used. It was a gift but I would like to know where to get some more!

The tins in use!

Wednesday, November 24, 2010

cakepops - the gobblegobble edition...

As my friend Robyn posted on my facebook...cake pops are all the rage. Actually, I think she called it a cakepop craze...and I think she might be right.

They are (relatively) easy, SO STINKING CUTE, and (reasonably) inexpensive.

They are easy in the sense that it is a baked box cake, crumbled and mixed with canned frosting. Then shaped into balls, chilled, put on a stick and dipped in chocolate. You really could leave them just like that (that would be called a cake ball) but it is more fun not too (most of the time)!

Now cuteness, there is no denying that! They really are adorable. I've heard about 10 times since I've been making them "Ohhh, it is too cute to eat". Then the people eat it and want the recipe :)

It really is reasonably inexpensive. Box cake is usually less than a dollar, as is canned frosting. The sticks are the second most expensive part if you're just doing the plain ones. At JoAnn's you can get 25 for $4.99 and then use a coupon to cut that in half. At the Decorette shop in Portland, OR I got 100 sticks for $1.25 :-) The chocolate is the most expensive part. I've tried the bulk section at Winco melting chips, the expensive "professional" brand from the Decorette, and Almond Bark I bought at Bi-Mart. I've tried the Wilton brand too. They also sell another variation at WalMart. Really the only place I have no found it is Safeway type grocery stores. 

When you do the decorated ones it can get a bit more expensive to get all the candies and sometimes certain candies can be hard to find. For example, when I was looking to make Thanksgiving Turkey cakepops I STRUGGLED to find light colored coffee bean size candy that could be the face. I even headed to the Sweet Factory at the mall and did end up getting chocolate covered coffee beans there...and then having to make a last minute realization that my black Americolor Gourmet Writer would not be able to write on it since it was the same color. So plan B became using white non-perennials and then drawing black dots on them. They did turn out cute!!

I had two wonderful helpers for this project in the form of one of my favorite friend's Sabrina and my wonderful Mom! We made a TON of cakepops. Really, it was too much and we would have survived with one batch but for some reason I had it in my head we needed a double batch. 3 hours later we had 27 turkey cakepops and over 50 sprinkled cakepops. It was a fun way to spend the day before Thanksgiving...with two of my favorite ladies!

*Make sure to scroll all the way down for a peak at a Christmas project...

And finally, the pictures :)


I pre-sorted out the colors we needed.

The stations were ready!

GOBBLE GOBBLE!!!

He looks a bit worried!

My wonderful helpers!
Well really, they did a majority of the work. I manned the microwave and sprinkles.

I LOVE this picture. Yes, this is of me. But I still love it. Something about all the colors...

Thanksgiving words.

The haul...One box for each of us!

The line up.

Yummy!!!


and a sneak peak at an idea I'm playing with for Christmas...

Gingerbread men :)

I used a Gingerbread Man Silicone mold that I got at JoAnn's (though I couldn't find a link to it on JoAnn's so this link is from another site). I wanted to see if it would work...and it needs a bit of tweaking but I think I'll try it!! There would be NO way I could make this shape by hand. And think of it...they are guaranteed to have hearts around Valentines, shamrocks around St. Patty's...the possibilities are endless!!

Monday, November 22, 2010

sewing - a body pillow case...

I pretty much can't sleep without a body pillow. I can muddle through a vacation without one but when it comes down too it, if I can bring it, I will. Like when we go to Auburn, it comes with us :) All this time I've been thinking about making a cozier cover for mine for when the weather drops. After Jason made me my craft room in a closet last week (more on that soon, I promise) it was the project I did the day after the camer strap. We also don't use the top, flat sheet for the bed so I already had the fabric which was a bonus for the checkbook!

The flat sheet that's been sitting in our closet for 3+ years!

About to begin!

Look how much I have left. I might make a blanket or some other pillow cases.

Ta-Da!

Please excuse the mess and crooked bed making...

Tuesday, November 16, 2010

the making of a camera strap...

We got our snazzy Canon Rebel for our anniversary and the strap, well it is just a black strap was CANON EOS on it. It really isn't too pretty and I've been wanting to spice it up for a while. I found a tutorial on the blog Skip To my Lou with a tutorial on how to make one. I finally got the fabric yesterday. I didn't want to get something too girlie or too busy, but wanted it to still be fun! I decided on a black/red/white combo to appease Jason and a little "paisley" to appease me!

I like the results. I"m totally head over heals for it but it is a great first try! I did buy double the amount I needed so mabye I"ll make version 2.0 sometime. I will also be making them in various other colors, of that I am sure. I took me under and hour to make...and to think, people sell these at $20 - $30 bucks a pop! Maybe that's another avenue I could go down. I seriously had a day dream today about getting a booth at a craft bazzar next year with me and maybe another friend or two who are crafty :) You never know!!!

On this project the ends of the fabric come about a quarter inch on each end from completely covering the strap which will probably annoy me enough to make version2.0 soon but over all it isn't the worth thing.

I really do need to invest in (or ask Santa for) a Quilters Rotary Set so that I can cut very straight lines. These lines...not so straight but it works none-the-less.

The colors. I was going to do poka-dots but it was too busy...

reinforced ends.

finished product.

in action.

:) view from the top

Thursday, November 11, 2010

pumpkin cake...

We headed up to my parents house last weekend for a family dinner with addition of some second cousin's of mine who were in town from Seattle. My parents always put on a good meal and do all the cooking, including desserts most of the time. I offered to make the dessert and my Mom knew she wanted to do something "fall-y". I thought about doing a cheesecake but apparently those are laborious and I was overwhelmed with the fact that I wouldn't be able to finish it in the time I had available.

So I called up my Mom and she gave me a recipe for a pumpkin dessert roll. My version turned into a mini-stacked cake since for some reason when I rolled it, it crumbled, but it was good none-the-less!!

All the ingredients. I had everything on hand already...which was a big bonus!

Pour the batter into a 10 X 12 jelly roll sheet lined with parchment paper and greased (I used PAM).

Bake for 15 minutes at 375 degrees.

Then, Cool for 10 minutes on a wire rack.

This is where you were supposed to 'roll' it. I tried and failed, so I stacked it!

Since it was 12 inches long I divided it into 4 sections that were 3 inches wide.

Frost with cream cheese frosting. I wanted it to look "messy/drippy" so I didn't have to be too careful :) Another bonus!!

Ready to serve. I did stick 3 lollipop sticks into the cake, one in the middle and two towards the ends, to support it (ie. make it stay standing) for the drive to my parents!!

Here is the whole recipe. It was less than an hour from start to finish!!!

Mom’s Pumpkin Roll

Cake.
3          eggs
2/3 C   Pumpkin Puree
1 tsp     lemon juice
¾ C     flour
1 tsp     baking powder
2 tsp     cinnamon
1 tsp     ginger
½ tsp    nutmeg
½ tsp    salt

Frosting/filling.
8 oz      Cream cheese
4 TB    Butter
1 C      Powdered Sugar
½ tsp    vailla

Combine dry ingredients for the cake and set aside. Beat eggs and sugar. Add wet ingredients (pumpkin, lemon juice) and mix. Add dry mixture. Spread into 10X12X1 pan that is lined with parchment and greased.

Bake 375 degrees for 15 minutes, or until done.

Cool 10 minutes in the pan.
Take a clean, thin (not fuzzy) dish towel and flip cake onto towel. From the short end (10) roll cake into a log shape. Cool in this position for 10 minutes. During this time making the frosting.

Unroll, spread frosting on cake.

Re-roll into log shape. Serve and enjoy!

Wednesday, November 10, 2010

Baller Bear cakepops...

At my work there are snacks every Friday brought by the different groups on a rotation/sign up schedule. It really is a nice treat! Every group brings snacks 3 times throughout the year and it varries every week. We decided this time to bring a variety of salad's to go with lunch and I could not resist trying out another cake pop recipe! After working with my Mom a few weeks ago it was so nice to have help and people to talk to so I did the logical thing...posted a request for helpers on facebook...and got a few bites. One of my co-workers Teresa and her daughter Lindsey came over to learn and to help. We made a double batch since a regular batches produces 40-45 but we have at least 65 people who work at my school!! They were an awesome help and I am sad to report that I did not take any pictures of us in the process of making them :( Just too busy with that many cakepops to make!!!

Storage. Away from the cat...

All set up. I think I need to make a cakepop stand.

A friendly little note.

Bears for the Baller Bears (our school name).

I heart teddy bears, especially those made of cake!

One little polar bear ready to eat!

Everyone loved them. I'm afraid I might have to make them for every school occasion now!

touch, touch, touch...

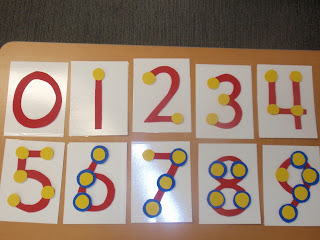
Touch Math! I teach my kiddo's touch math. It is easy, it is something they can apply to any number they see, and really...I still use it sometimes so obviously is is applicable to the real world! I saw a set of Touch Math foam numbers for the 'amazingly' low price of $99. I decided I could do better than that. Mine might not be as pretty or expensive, but they will certainly get the job done! All for under 5 dollars!!!

Touch numbers.

I'm very happy with the results.

my newest teaching tool.